Ubuntu Server Installation
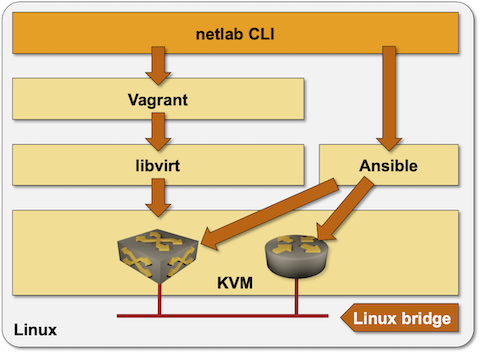
On a Linux system, netlab uses KVM to run virtual machines and Docker to run containers. Virtual machines in KVM environment and the associated Linux bridges are created with Vagrant using libvirt API. Ansible is used to configure the network devices.
The simplest way to install netlab and the whole low-level toolchain on an existing Ubuntu server (bare-metal or VM) is to use the netlab install command (see below). You could also do manual software installation.
If needed, install Python3 and pip3 with
sudo apt-get update && sudo apt-get install -y python3-pipInstall the netlab Python package with
sudo python3 -m pip install networklabor your preferred Python package installation procedure.
Tip
Installing Python packages as root is not the recommended best practice (but gets around the potential PATH problems). Please use your regular Python package installation process if you’re not setting up a throwaway VM/server.
Ubuntu 22.04 and later want you to install Python packages in a virtual environment. If you’re working on a throwaway VM/server, stop pip complaints with the
--break-system-packagesoption.Read this section if you want to install netlab in a Python virtual environment
Install additional software with
netlab install ubuntu ansible libvirt containerlabcommand (more details).
Tip
Running multiple installation scripts with netlab install might fail on some Ubuntu distributions. If you experience that problem, execute multiple netlab install commands (one per installation script).
After completing the software installation, log out from the VM, log back in, and test your installation with the netlab test command (other options). If those tests fail, you might have to use usermod to add your user to the libvirt and docker groups.
Installing netlab into a Python Virtual Environment
Follow this procedure[1] if you don’t want to install system-wide Python packages on your Ubuntu system:
Make sure your user is part of the sudo group, and that sudo works without a password (that’s the setup you usually get after installing Ubuntu).
Update APT repositories and install pip3 and Python virtual environment package:
$ sudo apt-get update
$ sudo apt-get install -y python3-pip python3-venv
Create a Python virtual environment, preferably in your home directory (make sure you use the
--system-site-packagesparameter).
$ cd ~
$ python3 -m venv --system-site-packages mylab
Activate the virtual environment
$ source mylab/bin/activate
Install netlab and use netlab install to install other software components:
$ pip3 install networklab
$ netlab install ubuntu containerlab libvirt ansible
Tip
Running multiple installation scripts with netlab install might fail on some Ubuntu distributions. If you experience that problem, execute multiple netlab install commands (one per installation script).
Use ideas from this discussion if ansible installation fails with pip3 errors.
Log out and log back in. Activate the virtual environment (you have to do that every time you log in unless you add the source command to your shell login script):
$ source mylab/bin/activate
Use the groups command to check that your user belongs vagrant and libvirt groups when using libvirt, or docker and clab_admins groups when using containerlab.
Test your installation with netlab test libvirt or netlab test clab.